

Welcome! I’m thrilled that you’ve landed here, and I’m grateful for the opportunity to guide you through this journey. In the ever-evolving world of technology, securing access to your APIs is akin to guarding the gates of a digital fortress. Imagine a bustling city where data flows like rivers, and every API is a gateway to a treasure trove of information. In this city, OAuth 2.0 is the vigilant gatekeeper, ensuring that only those with the right keys can enter.
OAuth 2.0, a widely used authorization protocol, is the hero of our story. It allows secure access to resources using access tokens, much like a secret handshake that grants entry to exclusive realms. In this guide, we’ll embark on a journey to integrate OAuth 2.0 with AWS API Gateway, ensuring your APIs are secure and accessible. By the end of this blog, you’ll have a solid understanding of OAuth 2.0 and how to implement it effectively.

Meet the Characters
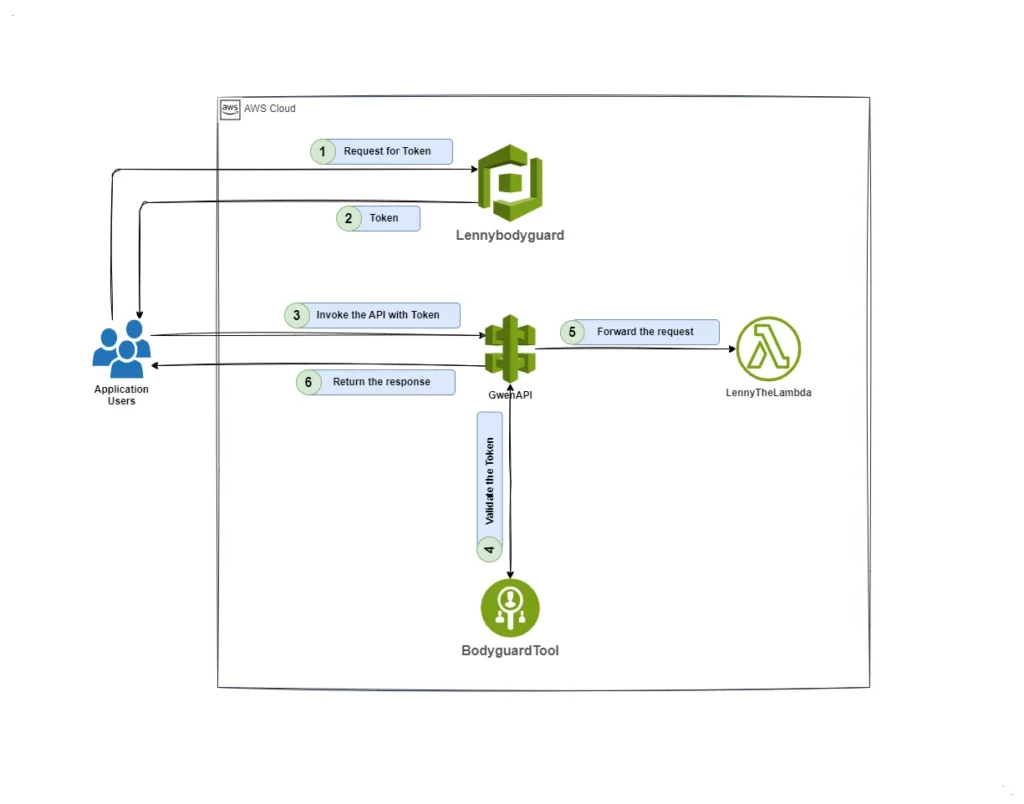
- Lenny the Lambda: Our trusty function handler, ready to execute code in response to API requests.
- Gwen the Gateway: The grand entrance to our digital city, managing and routing API requests.
- Pat the Postman: Our diligent tester, ensuring everything works smoothly by making API calls.
Prerequisites
Before we set off on this adventure, make sure you have:
- Basic knowledge of creating AWS Lambda functions.
- Basic knowledge of integrating API Gateway with Lambda functions.
- Familiarity with Amazon Cognito and its user pool setup.
- Understanding of OAuth 2.0 concepts and terminology.
- Check out my other blog on how to integrate API Gateway and Lambda.
Understanding OAuth 2.0
Our story begins with understanding our hero, OAuth 2.0. Also known as “Open Authorization,” OAuth 2.0 is a standard that allows applications to access resources hosted by other web apps on behalf of a user. This protocol enhances security by using access tokens, which act as magical keys to unlock protected resources.
Key Concepts of OAuth 2.0
- Resource Owner: The user or system that owns the protected resources.
- Client: The application requesting access to the resources.
- Authorization Server: Authenticates the user and issues access tokens.
- Resource Server: Hosts the protected resources and validates access tokens.
- Access Token: Represents authorization to access resources, often in JWT format.
Real-World Examples of OAuth 2.0 Usage
OAuth 2.0 is widely adopted across various industries and platforms. Here are a few real-world examples:
Google: When you use your Google account to sign into third-party applications like YouTube, Google Drive, or Google Photos, OAuth 2.0 is at work. It allows these apps to access your data without sharing your Google credentials.
Facebook: Many websites and apps offer the option to “Log in with Facebook.” This feature uses OAuth 2.0 to grant the app access to your Facebook profile and other data, without exposing your Facebook password.
GitHub: Developers often use OAuth 2.0 to integrate their applications with GitHub. This allows the app to access repositories, user data, and other resources on behalf of the user.
Create an AWS Cognito User Pool
Our journey begins in the Amazon Cognito console, where we will create a user pool, the foundation of our secure city.
Log in to your AWS Management Console and navigate to the Amazon Cognito service.
Create a new user pool:
- Go to “User Pools” and click “Create a user pool“.
- Configure the pool settings, selecting a Machine-to-machine application for OAuth 2.0 authentication and Name your application, e.g., Lennybodyguard. Click “Create”.
- AWS Cognito will provide options for different programming languages to get the access token. Click “Go to overview”.
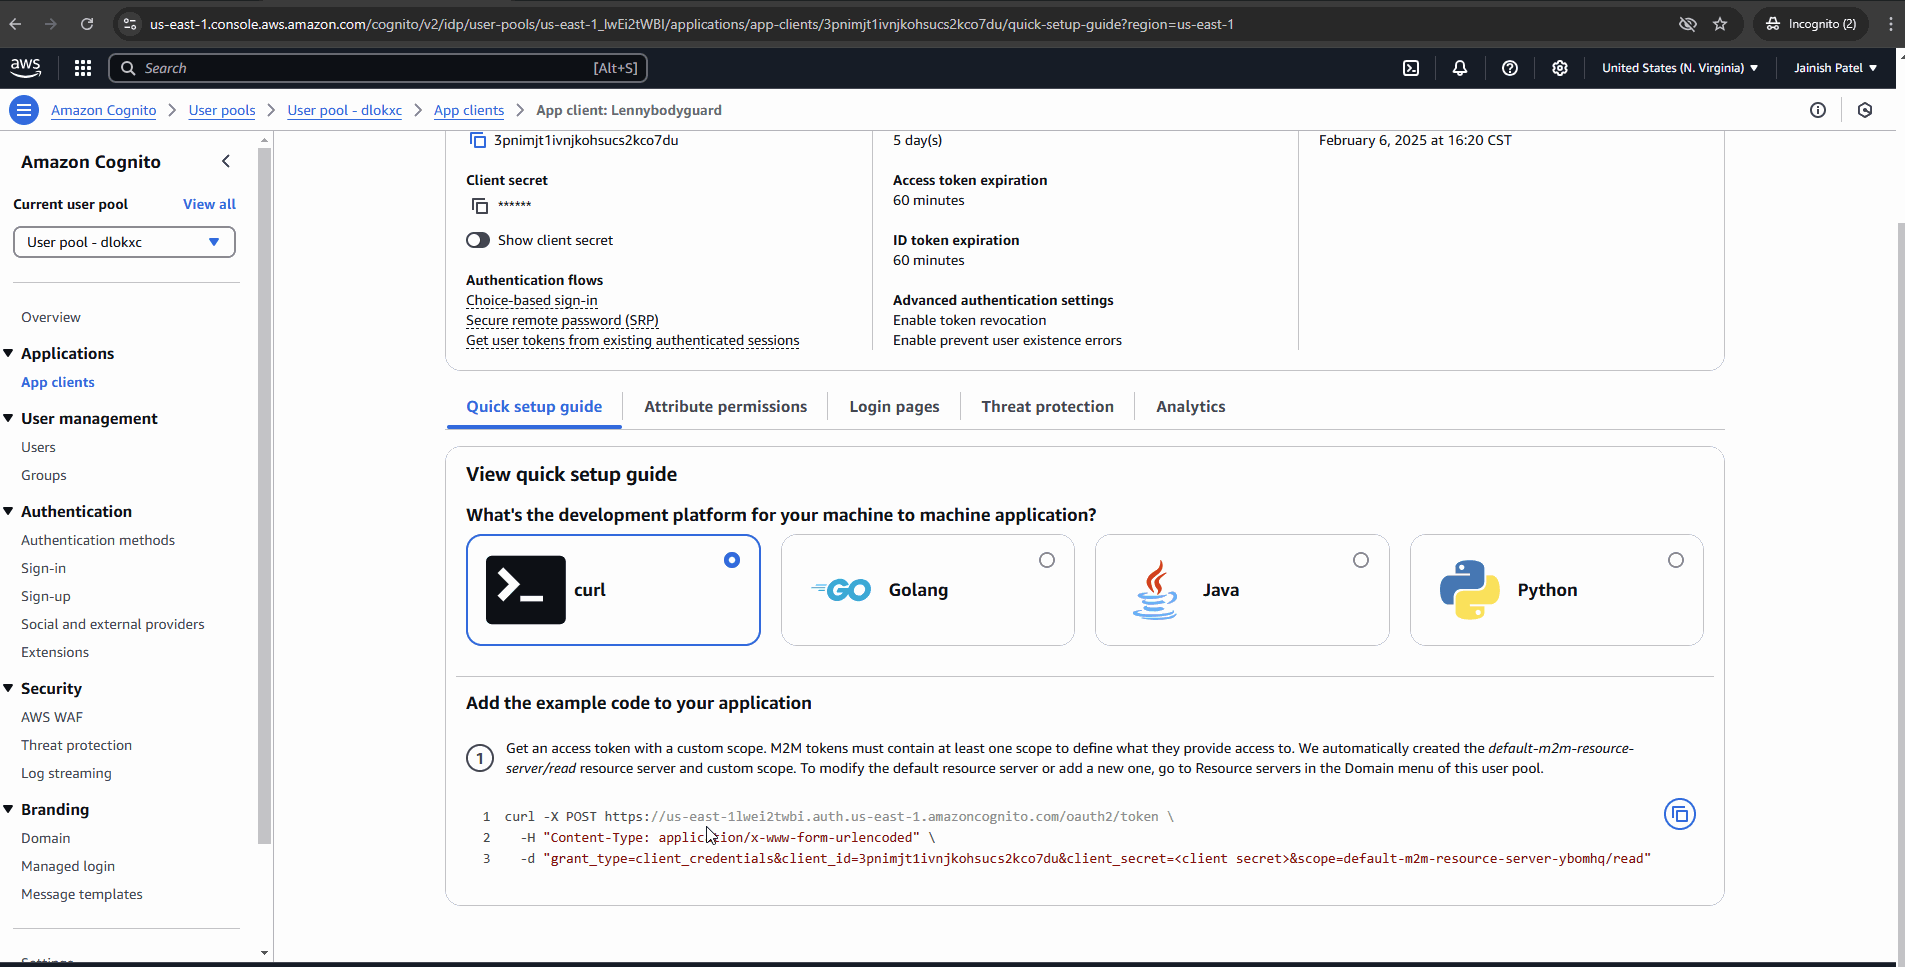
Setup OAuth 2.0:
- Go to “Applications” and click “App clients”.
- By default, Cognito will create the App Client. If the app client doesn’t exist, click “Create App Client”.
- Configure the app client and click on “App client Name” to see details like Client ID and Client Secret.
- Go to “Branding” and click “Domain” to see the default domain for your user pool. You can also create a custom domain.

Configure Cognito with API Gateway
With our user pool established, we now turn to Gwen the Gateway, the grand entrance to our digital city. Here, we will configure Cognito to act as the gatekeeper.
Note: Here I’m using the API that we have created previously. You can find the link in “Prerequisites” section.
Configure Cognito Authorizer:
- Navigate to the Amazon API Gateway console.
- Go to your API and click on “Authorizers”, then “Create Authorizer”.
- Provide the necessary information: Authorizer name (e.g., “BodyguardTool”) , type (Cognito), region, user pool, and token source (e.g., “Authorization” header). Click “Create Authorizer”.
Configure the Authorizer with your resource/method:
- Navigate to Resources and select your resource.
- Go to Method request and click “Edit”. Configure method request settings, selecting the Authorizer created earlier and providing the Authorization scope.
- Click “Save” and then “Deploy API”.

Test the Integration
Our journey nears its end as we test the integration using Pat the Postman, ensuring our gatekeeper is vigilant and our city secure.
Invoke the API to get the Access Token:
- Get the Token API endpoint, Client ID, and Client Secret from your Cognito setup.
- Configure Postman to make an API call to get the Access Token using Basic Auth.
Invoke the API with the Access Token:
- Use the Access Token to make a request to your API, selecting “Bearer Token” in Postman.
Testing Your Configuration
Before configuring Step 3.2, it’s crucial to test your setup. Invoke the API from Postman and ensure you get a “401: Unauthorized” error. This indicates that the access token is required and the authorizer is working correctly. If your API returns a success message without the token, the deployment or authorizer configuration might not be correct. This step ensures that OAuth 2.0 is properly integrated before proceeding with further testing.
Expert Tip: Maximizing Security with OAuth 2.0 and API Keys
Combining OAuth 2.0 and API keys can significantly enhance the security and flexibility of your API authentication. Here are some key benefits:
- Enhanced Security: Layered authentication with OAuth 2.0 and API keys adds an extra layer of security, ensuring that only authorized applications can access the API.
- Fine-Grained Access Control: OAuth 2.0 allows for scoped access and user-specific permissions, while API keys provide an additional check to control access to specific applications or services.
- Improved Management and Monitoring: OAuth 2.0 supports token revocation and usage tracking, while API keys allow for better monitoring of API usage.
- Simplified Integration: OAuth 2.0 provides a seamless user experience, and API keys are simple to implement, making them a developer-friendly option.
Cherry on the Cake: Imagine adding an extra layer of security to our digital city by integrating the x-api-key along with OAuth 2.0. This additional gatekeeper ensures that even if someone has the key to our city, they can only enter through one specific gate. Please leave a comment if you would like me to have a blog on how to integrate x-api-key with API Gateway.
The Gates of Our Digital City
In our digital city, each gate represents a different entry point to access various resources and services. Here’s how the gates work:
Main Gate (OAuth 2.0): This is the primary gate where users authenticate themselves using OAuth 2.0. It ensures that only those with valid access tokens can enter the city. This gate verifies the identity of the user and grants access based on the permissions associated with their token.
Secondary Gates (API Keys): These gates add an extra layer of security. Even if a user has a valid access token, they need an API key to pass through these gates. Each API key is unique to a specific application or service, ensuring that access is tightly controlled and monitored. This way, even if the same user pool is integrated with other gates of the city, access is restricted to specific areas.
Specialized Gates (Scopes and Permissions): Within the city, there are specialized gates that control access to different resources based on scopes and permissions. For example, one gate might allow access to user profile data, while another gate grants access to financial information. These gates ensure that users can only access the resources they are authorized to view.
By combining OAuth 2.0 with API keys, we create a multi-layered security system that protects our digital city from unauthorized access. This additional layer of authentication ensures that even if someone has access to our digital city, they can only enter through one specific gate, making our city even more secure.
Troubleshooting
- 401 Unauthorized Error: Ensure the access token is correctly configured and the authorizer is properly set up.
- Invalid Token: Verify the token’s validity and ensure it hasn’t expired.
- API Gateway Configuration Issues: Double-check the settings in the API Gateway console to ensure everything is correctly configured.
Conclusion
By following these steps, you can securely integrate OAuth 2.0 with AWS API Gateway, ensuring only authorized users can access your API resources. This integration not only enhances security but also streamlines access management. Our digital city is now fortified, with OAuth 2.0 standing guard, ready to protect and serve.